View Dialog - pgAdmin 4 3.2 documentation
Use the View dialog to define a view. The view is not physically materialized; the query is executed each time the view is referenced in a query.
The View dialog organizes the development of a View through the following dialog tabs: General , Definition , and Security ". The SQL tab displays the SQL code generated by dialog selections.
Click the General tab to begin.
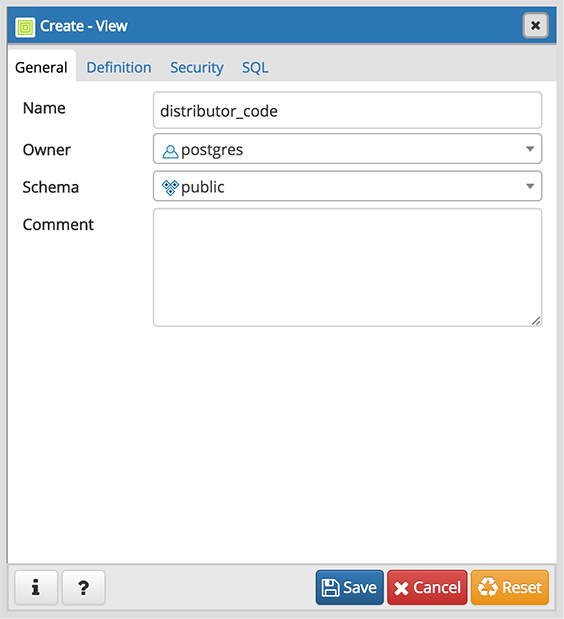
Use the fields in the General tab to identify a view:
- Use the Name field to add a descriptive name for the view. The name of the view must be distinct from the name of any other view, table, sequence, index or foreign table in the same schema. The name will be displayed in the pgAdmin tree control.
- Use the drop-down listbox next to Owner to select the role that will own the view.
- If applicable, select the name of the schema in which the view will reside from the drop-down listbox in the Schema field.
- Store notes about the view in the Comments field.
Click the Definition tab to continue.
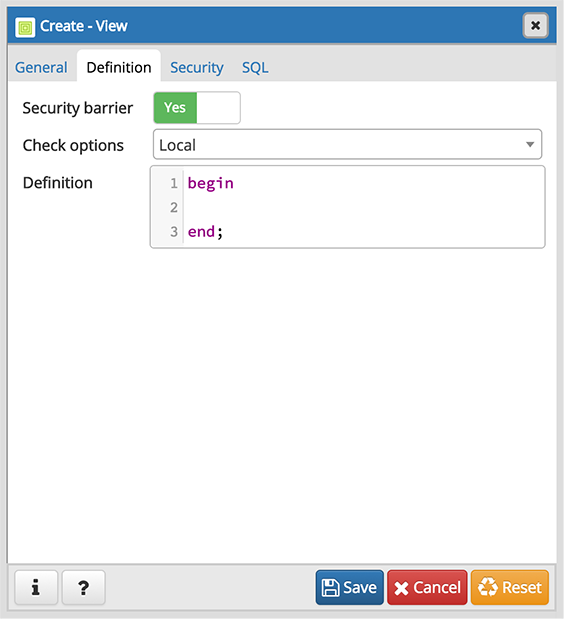
Use the fields in the Definition tab to define properties of the view:
- Set the Security Barrier switch to Yes to indicate that the view is to act as a security barrier. For more information about defining and using a security barrier rule, see Section 38.5 of the PostgreSQL documentation.
-
- Use the drop-down listbox next to Check options to select from No , Local or Cascaded .
- The Local option specifies that new rows are only checked against the conditions defined in the view. Any conditions defined on underlying base views are not checked (unless you specify the CHECK OPTION). The Cascaded option specifies new rows are checked against the conditions of the view and all underlying base views.
- Use the workspace in the Definition field to write a query to create a view.
Click the Security tab to continue.
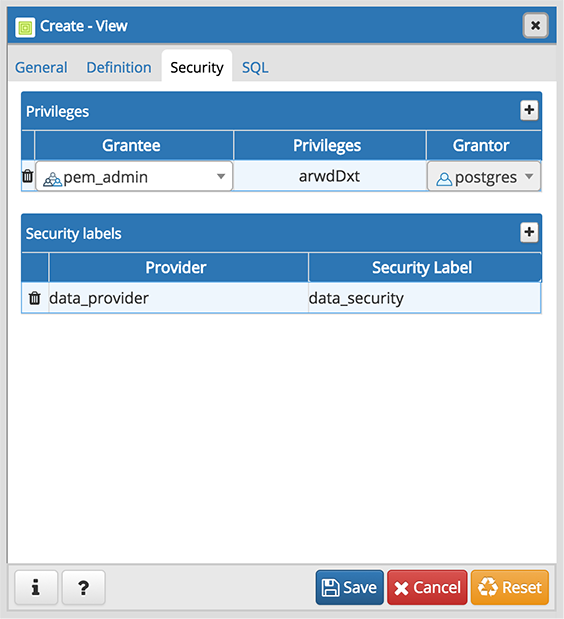
Use the Security tab to assign privileges and define security labels.
Use the Privileges panel to assign privileges to a role. Click the Add icon (+) to set privileges for the view:
- Select the name of the role that will be granted privileges from the drop-down listbox in the Grantee field.
- Click inside the Privileges field. Check the boxes to the left of one or more privileges to grant the selected privilege to the specified user.
- Select the name of a role with sufficient privileges to grant privileges on the view from the drop-down listbox in the Grantor field. The default grantor is the owner of the database.
Click the Add icon (+) to assign additional privileges; to discard a privilege, click the trash icon to the left of the row and confirm deletion in the Delete Row popup.
Use the Security Labels panel to define security labels applied to the view. Click the Add icon (+) to add each security label selection:
- Specify a security label provider in the Provider field. The named provider must be loaded and must consent to the proposed labeling operation.
- Specify a a security label in the Security Label field. The meaning of a given label is at the discretion of the label provider. PostgreSQL places no restrictions on whether or how a label provider must interpret security labels; it merely provides a mechanism for storing them.
Click the Add icon (+) to assign additional security labels; to discard a security label, click the trash icon to the left of the row and confirm deletion in the Delete Row popup.
Click the SQL tab to continue.
Your entries in the View dialog generate a SQL command (see an example below). Use the SQL tab for review; revisit or switch tabs to make any changes to the SQL command.
Example
The following is an example of the sql command generated by user selections in the View dialog:
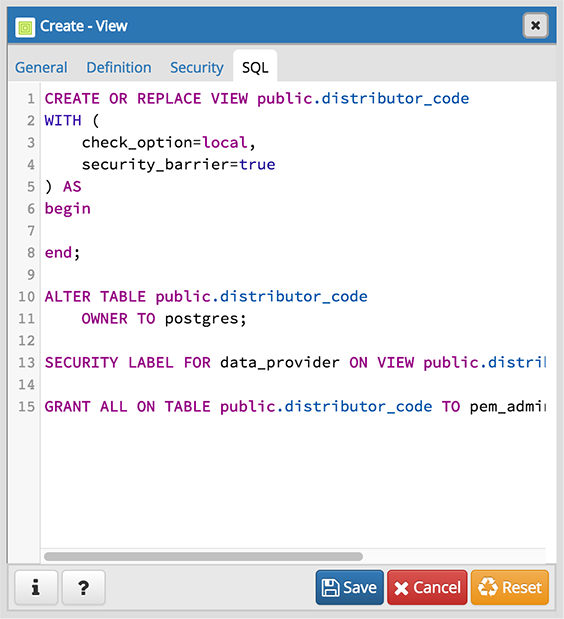
The example shown demonstrates creating a view named distributor_codes that includes the content of the code column from the distributors table.
- Click the Info button (i) to access online help. View context-sensitive help in the Tabbed browser , where a new tab displays the PostgreSQL core documentation.
- Click the Save button to save work.
- Click the Cancel button to exit without saving work.
- Click the Reset button to restore configuration parameters.